Publish your SDKs
Once you are satisfied with your SDK, you can distribute it to end users by publishing it to a package registry, like npm, PyPI, or RubyGems. After publishing, the generated SDK code will be moved to a GitHub repository that you own, where it will be picked up by package registries.
The Stainless-managed release flow handles the versioning and changelogs expected from a production-quality SDK. You can even automate this process so changes to your OpenAPI specification will trigger new releases.
1 Link production repos
Section titled “ Link production repos”Before you publish an SDK, we push the generated code to a staging repo
under the stainless-sdks GitHub organization. When your SDK is published, we
instead push the generated SDK code to a GitHub repo you own, called the
production repo.
Install the Stainless GitHub app
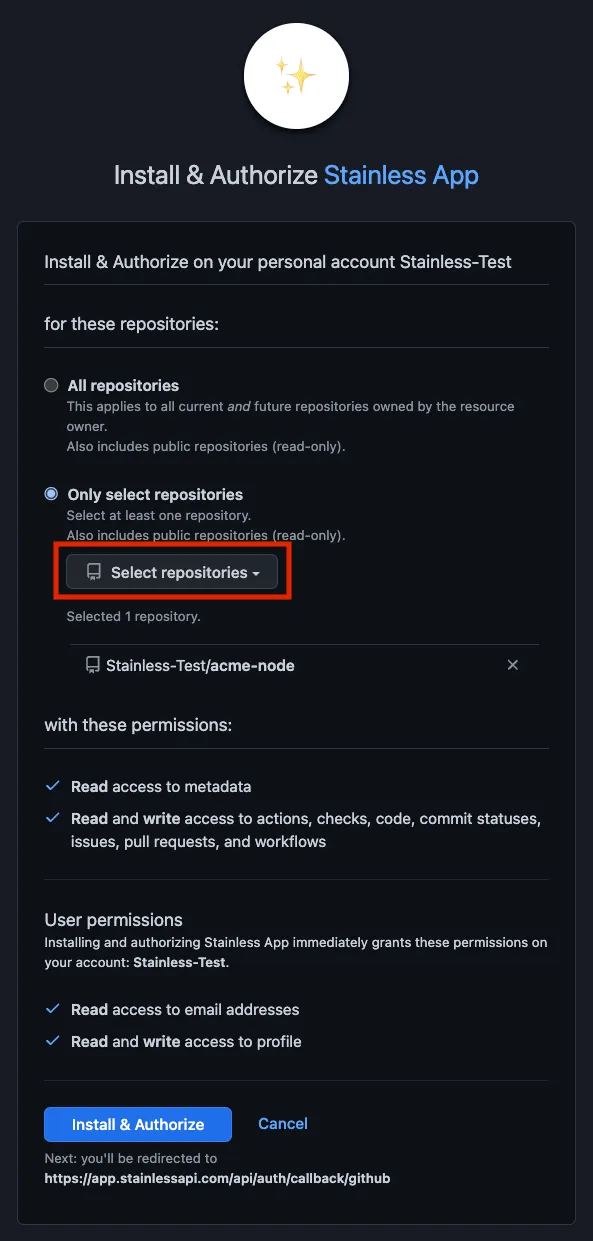
Section titled “Install the Stainless GitHub app”If your Stainless organization does not already have the Stainless GitHub app installed, you’ll need to install it first.
- In the Stainless dashboard, navigate to your project.
- Navigate to Release > Production repos.
- Follow the installation flow. When prompted, select which repos the Stainless GitHub app can access.
- Once repos have been selected and permissions have been reviewed, click Install & Authorize.
Choose a production repo
Section titled “Choose a production repo”After installing the Stainless GitHub app, you can then choose or create the production repo for each SDK.
We recommend choosing a name that meaningfully identifies your SDK. For
example, <company-name>-python is a common choice for Python SDKs.
The repo can be public or private.
- In the Stainless dashboard, navigate to your project.
- Navigate to Release > Production repos.
- If the Stainless GitHub app is installed, you will see a list of languages for your project. For each SDK you want to publish, use the dropdown to choose or create its production repo.
- Optionally, configure which branch of the production repo to push code to, by selecting it from the dropdown next to the repo name.
2 Connect package registries
Section titled “Connect package registries”Package registries like npm and PyPI make it easy to distribute your packages to your users. After an initial setup, Stainless can automatically publish code from your production repo to various package registries.
Node/TypeScript: npm
Section titled “Node/TypeScript: npm”Get an access token
-
Log in or sign up at npm.
-
Select your profile picture on the top right to open a dropdown.
-
Navigate to Access Tokens > Generate New Token.
-
Choose a token version:
-
Classic Token, with Automation as the token type. This token will be scoped to your whole account.
-
Granular Access Token, scoped to the NPM package you’re publishing. The token needs read and write permissions. If you don’t have an existing NPM package, you can make an empty one as a starting point.
-
Add the token to your production repo
- In the production repo, navigate to Secrets and variables > Actions > New repository secret.
The URL should look like
https://github.com/<org>/<repo>/settings/secrets/actions/new. - Add a new secret named
NPM_TOKENwith your API token.
Choose a package name and update your Stainless config
-
Choose an available package name.
You can check if the name is available.
If you are using an existing NPM package, check the publishing access, under package settings, so that it doesn’t require two-factor authentication.
-
Update the Stainless config with your package name and save.
targets:typescript:package_name: <package-name>publish:npm: true
Create a JSR package
- Log in or sign up at JSR.
- Select Publish a package.
- Choose an appropriate scope and package name.
- Select Create.
(Option 1) Publish with GitHub OIDC
-
In JSR, navigate to <package-name> > Settings > GitHub Repository.
-
Link the production repo to the JSR package you created.
-
Navigate to your <scope-name> > Settings > GitHub Actions security.
-
Select Do not restrict publishing. This will let the Stainless GitHub App publish even though it is not a member of your scope.
-
Update the Stainless config with your package name and save.
targets:typescript:publish:jsr:package_name: @<scope-name>/<package-name>
(Option 2) Use access token to publish
-
In JSR, navigate to Account > Tokens > Personal access tokens > Create new token.
-
Navigate through wizard to get your token:
- Publish packages
- A development machine
- Create a token
- Create a token for the package name.
-
In your production repo, navigate to Secrets and variables > Actions > New repository secret. The URL should look like
https://github.com/<org>/<repo>/settings/secrets/actions/new. -
Add a new secret named
JSR_TOKENwith your API token. -
Update the Stainless config with your package name and
use_access_token, and save.typescript:package_name: <package-name>publish:npm: truejsr:package_name: @<scope-name>/<package-name>use_access_token: true
Get an API token
-
Log in or sign up at PyPI.
-
Select your profile picture on the top right to open a dropdown.
-
Navigate to Access settings > API tokens > Add API token. You may have to verify your email address and set up 2FA if you haven’t already done so.
Note: If you haven’t created a PyPI package yet, you can create an API token scoped to your whole account, or you can create an empty PyPI package to use as a starting point.
Add the token to your production repo
- In your production repo, navigate to Secrets and variables > Actions > New repository secret.
The URL should look like
https://github.com/<org>/<repo>/settings/secrets/actions/new. - Add a new secret named
PYPI_TOKENwith your API token.
Choose a package name and update your Stainless config
-
Choose an available package name. Suggested names are:
<company-name><company-name>-client
You can check whether the name is available by testing the link at
https://pypi.org/project/<package-name>. -
Update the Stainless config with your package name and save.
targets:python:package_name: <package-name>publish:pypi: true
Go installs packages from source, so nothing other than the GitHub repository is required for setup. We automatically request updates from the Go package index which updates your godoc on a release.
We publish JVM packages to Sonatype. Sonatype has both a legacy (OSSRH) publishing flow and a new Central Portal publishing flow.
If you do not already publish to OSSRH, you will most likely have to use the new Central Portal publishing flow. If you are already publishing to OSSRH, you can continue to do so.
Update your Stainless config (Central Portal only)
For backwards compatibility, the default sonatype_platform is ossrh. If you are using the Central Portal, you need to update the Stainless config to portal:
targets: java: reverse_domain: com.example.api publish: maven: sonatype_platform: portalAdd namespace (Central Portal only)
-
Add a namespace on Sonatype Portal
The namespace will be part of your package’s name. It will be the inverse of the domain that you own. i.e.
tld.domain.subdomain -
Copy the Verification Key
You will be able to prove your ownership of the namespace by adding a TXT record of the verification key to your domain.
Prove ownership over your domain
Add a temporary TXT record to the DNS for your primary domain (the reverse of your groupId) to verify that the person registering this Java group actually controls the domain.
If using the Central Portal flow, the contents of the TXT record is the verification key provided by Sonatype.
If using the OSSRH flow, the contents of the TXT record is the ID of the JIRA ticket created in the previous step (for example, OSSRH-12345).
Generate user token (Central Portal only)
From the Sonatype dashboard, generate a user token XML file.
Extract <username>…</username> and <password>…</password> from the XML file and store them somewhere secure.
<server> <id>${server}</id> <username>//P7KNy5</username> <password>+8sEiCiUrSoODM/S4yFhiKqUWJzS1lDbcac5I7hVzPS4</password></server>Generate a PGP key
-
Install GnuPG.
-
In a terminal, run
gpg --gen-key. Enter your name, email, and a passphrase for the keypair. -
Run
gpg --list-keys --keyid-format short:Terminal window % gpg --list-keys --keyid-format short[keyboxd]---------pub ed25519/7FAD9FAA 2023-08-02 [SC] [expires: 2026-08-01]418D41921938A753CAAE57985114AD037FAD9FAAuid [ultimate] Your Organization <you@yourorg.com>sub cv25519/07EB38A7 2023-08-02 [E] [expires: 2026-08-01] -
Export the key in ASCII-armored format. In the above example, the short key ID is
7FAD9FAA.Terminal window $ gpg --export-secret-keys --armor 7FAD9FAA-----BEGIN PGP PRIVATE KEY BLOCK-----lIYEZMpnEhYJKwYBBAHaRw8BAQdA1FQMKz+wwliKNdLehegZP0QiaKrZJqADNyVnVCUzIrD+BwMCwZrqVbVPfSr8NwxEh3M6kWtMGmnLMOk/NWVe7dtCxDxo37l/NcxjMm9EZiH6WXwoXXq20nOW354oNOVz/UPvDU+oaRDDUM9SYs392i69WLQjWW91ciBPcmdhbml6YXRpb24gPHlvdUB5b3Vyb3JnLmNvbT6ImQQTFgoAQRYhBEGNQZIZOKdTyq5XmFEUrQN/rZ+qBQJkymcSAhsDBQkFo5qABQsJCAcCAiICBhUKCQgLAgQWAgMBAh4HAheAAAoJEFEUrQN/rZ+qgtsBAMCBuTqYEJljxStRO7SsMLWOc47CIIXD0YidCbySBX0ZAP9DXuuGVYbHFONvHxNKszu2hY9A1BbRuNjeGeWuVOw9ApyLBGTKZxISCisGAQQBl1UBBQEBB0AFxkZ+ZdEN7Epwri/w5ETAf+MOqdwAP2sS6TccSjEiXQMBCAf+BwMCtKG1TBUSC/z8tn761I5j+ifVIuMqdQPYIhZtjvIyC+NyrBi0j1ZtUG4ADAeDKNyM63uyb7omOH8+Lu0J71SGhVnZWszUOf3rrT/TA5MktYh+BBgWCgAmFiEEQY1Bkhk4p1PKrleYURStA3+tn6oFAmTKZxICGwwFCQWjmoAACgkQURStA3+tn6qaXAD/W2ucVURngmCUiUtdjQAZz36yQYPQmBhcdabZMyXKHz0A/itwYkuRbD2mp4p/xJk/QLXs/2/xBA6s0ROVVspy6MEA=p/g/-----END PGP PRIVATE KEY BLOCK----- -
Publish your PGP public key.
Terminal window $ gpg --keyserver keyserver.ubuntu.com --send-keys 7FAD9FAAIf you get the following error:
gpg: sending key XXXXXX to hkp://keyserver.ubuntu.comgpg: keyserver send failed: No route to hostthen your computer might be trying to use IPv6 and failing. Run the following to get keyserver.ubuntu.com’s IPv4 addresses:
Terminal window $ host keyserver.ubuntu.comkeyserver.ubuntu.com has address XXX.XXX.XXX.XXkeyserver.ubuntu.com has address XXX.XXX.XXX.XXkeyserver.ubuntu.com has IPv6 address XXXX:XX:XXXX:XXXX::XXXkeyserver.ubuntu.com has IPv6 address XXXX:XX:XXXX:XXXX::XXXThen rerun the
gpgcommand with one of the IPv4 addresses:Terminal window $ gpg --keyserver XXX.XXX.XXX.XX --send-keys 7FAD9FAA
Add secrets to your production repo
- In the production repo, navigate to Secrets and variables > Actions > New repository secret.
The URL should look like
https://github.com/<org>/<repo>/settings/secrets/actions/new. - Add the following secrets:
-
GPG_SIGNING_KEY: your PGP private key. It should be the entire output ofgpg --export-secret-keys --armor <keyid>. -
GPG_SIGNING_PASSWORD: the passphrase you entered when creating the keypair. -
SONATYPE_USERNAME: username for your Sonatype account. -
SONATYPE_PASSWORD: password for your Sonatype account (OSSRH) or your Sonatype user token (Central Portal).
Get an API token
- Log in or sign up at RubyGems.
- Select your profile picture on the top right to open a dropdown.
- Navigate to Settings.
- If you have MFA enabled, set the level to “UI and gem signin”.
- Navigate to API keys.
- Create a new API key with the “Push rubygems” privilege. If you have MFA enabled, make sure “Enable MFA” is unchecked.
Add the token to your production repo
- In your production repo, navigate to Secrets and variables > Actions > New repository secret.
The URL should look like
https://github.com/<org>/<repo>/settings/secrets/actions/new. - Add a new secret named
GEM_HOST_API_KEYwith your API token.
Choose a package name and update your Stainless config
-
Choose an available package name. Suggested names are:
<company-name><company-name>-client
You can check whether the name is available by testing the link at
https://rubygems.org/gems/<package-name>. -
Update the Stainless config with your package name and save.
targets:ruby:gem_name: <package-name>publish:rubygems: true
Set the Composer package name in the Stainless config
Navigate to the targets section of your stainless config, and ensure it resembles the following.
targets: php: package_name: acme composer_package_name: 'acme-org/acme-php' # <- Packagist installation name publish: packagist: trueThe composer_package_name will appear in Packagist.
Make sure that the name follows the convention of the Composer specification,
which is roughly equivalent to vendor/package-name.
The composer_package_name name must be available on Packagist.
Set up a Packagist account and package
- Log in or sign up at Packagist.
- Navigate into your profile by clicking on your username in the top right corner.
- Navigate to the “Settings” section of your profile, and ensure your account is connected via Github.
- Click the “Submit” button at the top and add your production Github repository, and follow the packagist instructions.
Find your Packagist “Safe API Token”
- Ensuring you are signed in on Packagist, click on your username in the top right corner.
- Ensure the sidebar is set to the “Profile” section.
- Click the “Safe API Token” tab, it is not necessary to use the “Main API Token”. However it must remain
Add secrets to your production repo
- Ensure your Github actions environment has your Stainless API Key
- In the production repo, navigate to Secrets and variables > Actions > New repository secret.
The URL should look like
https://github.com/<org>/<repo>/settings/secrets/actions/new. - Add the following secrets:
-
PACKAGIST_SAFE_KEY: Your Packagist Safe API Token -
PACKAGIST_USERNAME: Your username in Packagist as it appears in the top-right corner.
The following steps allow you to publish your provider to the registry. If you have more custom requirements, you can also refer to the official HashiCorp publishing documentation.
Connect Terraform Registry to your production repo
- Log in or sign up at the Terraform Registry.
- Select
Publish Provider. - Follow the instructions to install the Hashicorp GitHub App.
- In the provider publishing page, select the connected user / organization.
- Select your production repo and follow the instructions to install the webhooks required to publish the provider.
Generate a PGP key
- Install GnuPG.
-
In a terminal, run
gpg --full-generate-key. Follow the prompts to select an RSA/DSA key, and input your organization’s information. -
Run
gpg --list-keys --keyid-format short:Terminal window % gpg --list-keys --keyid-format short[keyboxd]---------pub rsa3072/69568313 2025-03-22 [SC] [expires: 2025-03-23]1577714D2E1545CC87291B3A1703FF1469568313uid [ultimate] Your Organization <you@yourorg.com>sub rsa3072/26D93FE8 2025-03-22 [E] [expires: 2025-03-23] -
Export the key in ASCII-armored format. In the above example, the short key ID is
69568313.Terminal window $ gpg --export-secret-keys --armor 69568313-----BEGIN PGP PRIVATE KEY BLOCK-----lQWGBGffFm0BDADEUBBMBLQ2qRg8YPKBln9VKolAcFiq6CwehhnHw1B8xr9BiVnY0ekDmOkAWIhU1zG+AFULhsvWowld55pMglPW1Mptpfb2AqJdbglr2iStUjSn+Jn1riRKaP3YQErtV0/dBRFcM8F4LdGK8NhSYnrEyGb1eFCBawHxU/P09+Otcxs+9mvyjSFiWBrrK45H62sDQq2HYrjLXcytD0WpqLAxgxLN6cGwtwmfd6TAMQeJ248Qa97M...CriOVP9mAUyhez1k6tuVi5U0mDp9KeMj3zJcsTjTEvqe+8wQQoRgtqyY60yXkJJ6HvapRVLjxiU8/x+VltFn7sxm+LDoSEc8hcsIrT19uIyA4HOEo9etJI/VT31Tt39SXW4n8ELhMIdxDq0jZp/93ONsPBmjZ0L/qbDH6ytT0FSEuSt05CY7=VDjv-----END PGP PRIVATE KEY BLOCK----- -
Publish your PGP public key.
Terminal window $ gpg --keyserver keyserver.ubuntu.com --send-keys 69568313If you get the following error:
gpg: sending key XXXXXX to hkp://keyserver.ubuntu.comgpg: keyserver send failed: No route to hostthen your computer might be trying to use IPv6 and failing. Run the following to get keyserver.ubuntu.com’s IPv4 addresses:
Terminal window $ host keyserver.ubuntu.comkeyserver.ubuntu.com has address XXX.XXX.XXX.XXkeyserver.ubuntu.com has address XXX.XXX.XXX.XXkeyserver.ubuntu.com has IPv6 address XXXX:XX:XXXX:XXXX::XXXkeyserver.ubuntu.com has IPv6 address XXXX:XX:XXXX:XXXX::XXXThen rerun the
gpgcommand with one of the IPv4 addresses:Terminal window $ gpg --keyserver XXX.XXX.XXX.XX --send-keys 69568313
Add secrets to your production repo
- In the production repo, navigate to Secrets and variables > Actions > New repository secret.
The URL should look like
https://github.com/<org>/<repo>/settings/secrets/actions/new. - Add the following secrets:
-
GPG_SIGNING_KEY: your PGP private key. It should be the entire output ofgpg --export-secret-keys --armor <keyid>. -
GPG_SIGNING_PASSWORD: the passphrase you entered when creating the keypair.
Update your Stainless config
-
Update the Stainless config and save.
targets:terraform:publish:hashicorp_registry: true
Merge your release PR and see it appear in the Registry
- Merge your release PR when you’re ready. This should then create a tag, use goreleaser to build artifacts, and attach it to the release. Hashicorp will then import the release into their registry. You might need to wait a few minutes for it to show up on your provider page.
Get an API token
- Log in or sign up at NuGet.
- Select your username at the top right to open a dropdown.
- Navigate to API Keys.
- Create a new API key with the Push new packages and package versions privilege. Under Select Packages, either enter your package name or a glob (e.g. ”*”).
Add the token to your production repo
- In your production repo, navigate to Secrets and variables > Actions > New repository secret.
The URL should look like
https://github.com/<org>/<repo>/settings/secrets/actions/new. - Add a new secret named
NUGET_API_KEYwith your API token.
Choose a package name and update your Stainless config
-
Choose an available package name. Suggested names are:
<company-name><company-name>.Client
You can check whether the name is available by testing the link at
https://www.nuget.org/packages/<package-name>. -
Update the Stainless config with your package name and save.
targets:csharp:package_name: <package-name>publish:nuget: true
Versioning and releases
Section titled “Versioning and releases”Whenever your SDK changes because of an update to your OpenAPI spec,
your Stainless config, or our code generation, we push the
changes to the next branch of your production repository.
A release PR is then created against the main branch, which collects
individual changes as commits until you are ready to release them. By default,
we will never merge release PRs until they’re reviewed. This leaves the release
frequency up to you.
Your first release will be Release 0.1.0-alpha.1, meaning that the first release published to your package
manager will have an alpha tag.
Stainless will increment the version used in each subsequent release PR based on the prior one. We use the semantic information of the commits in the release to find the next available version, and for this reason commits should use the Conventional Commits to ensure versioning is correctly and automatically incremented:
- Breaking changes increment the major version number (if and only if the version is already at least
1.0.0) - Features increment the minor version number
- Fixes increment the patch number
How to customize the release version
Section titled “How to customize the release version”
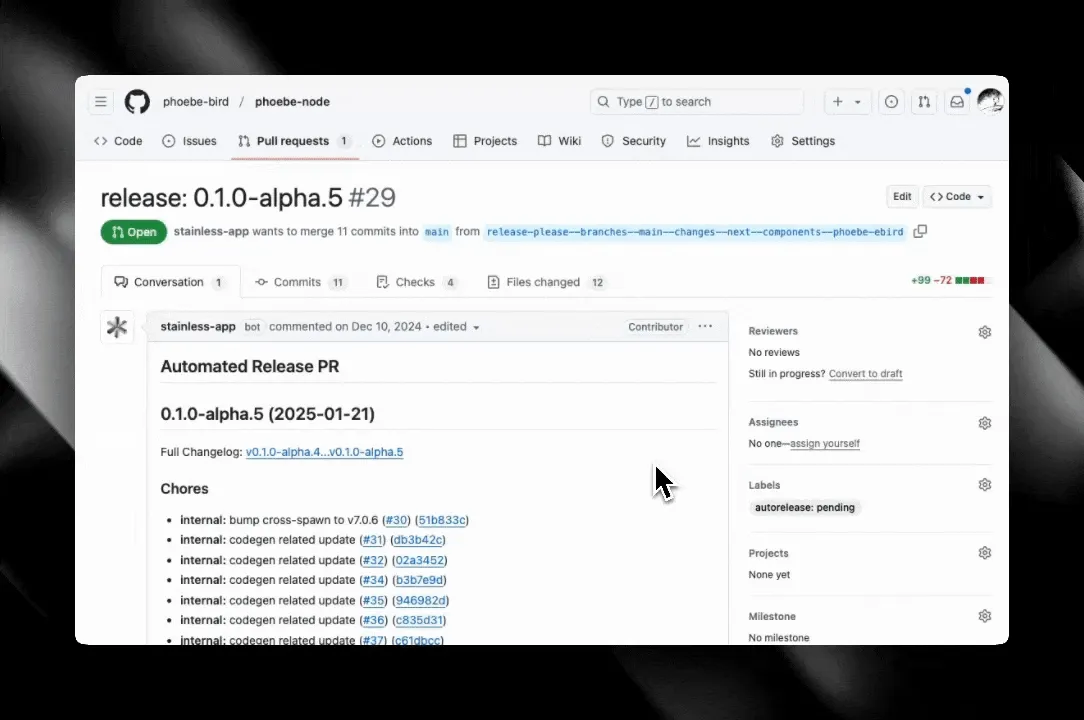
You can override our suggested version by modifying the PR title. Doing so will propagate your provided version (including any alpha or beta tags) to the release in Github and your package manager. We recommend:
- Staying in the alpha or beta stage while your SDKs still have diagnostic errors
- Staying in the 0.0.x range while your SDKs still have diagnostic warnings
- Staying in the 0.x.y range while your SDKs still have unacknowledged diagnostic notes
- Moving to 1.0.0 once your SDK has none of the above
We use semver-valid version numbers for releases.
How to move out of alpha
Section titled “How to move out of alpha”Once you’re ready to move out of an alpha stage, the only thing you need to do is customize the release version to the appropriate version. In most cases the next version after alpha should be 0.0.1.
If you don’t have a release PR, you can make an empty commit on the next
branch of your production repo with a Conventional Commit message.
Development and release flow
Section titled “Development and release flow”Stainless pushes code to various GitHub repos:
- Stainless config repo
- Stainless SDK repos
- Your production repos
Release flow
Section titled “Release flow”
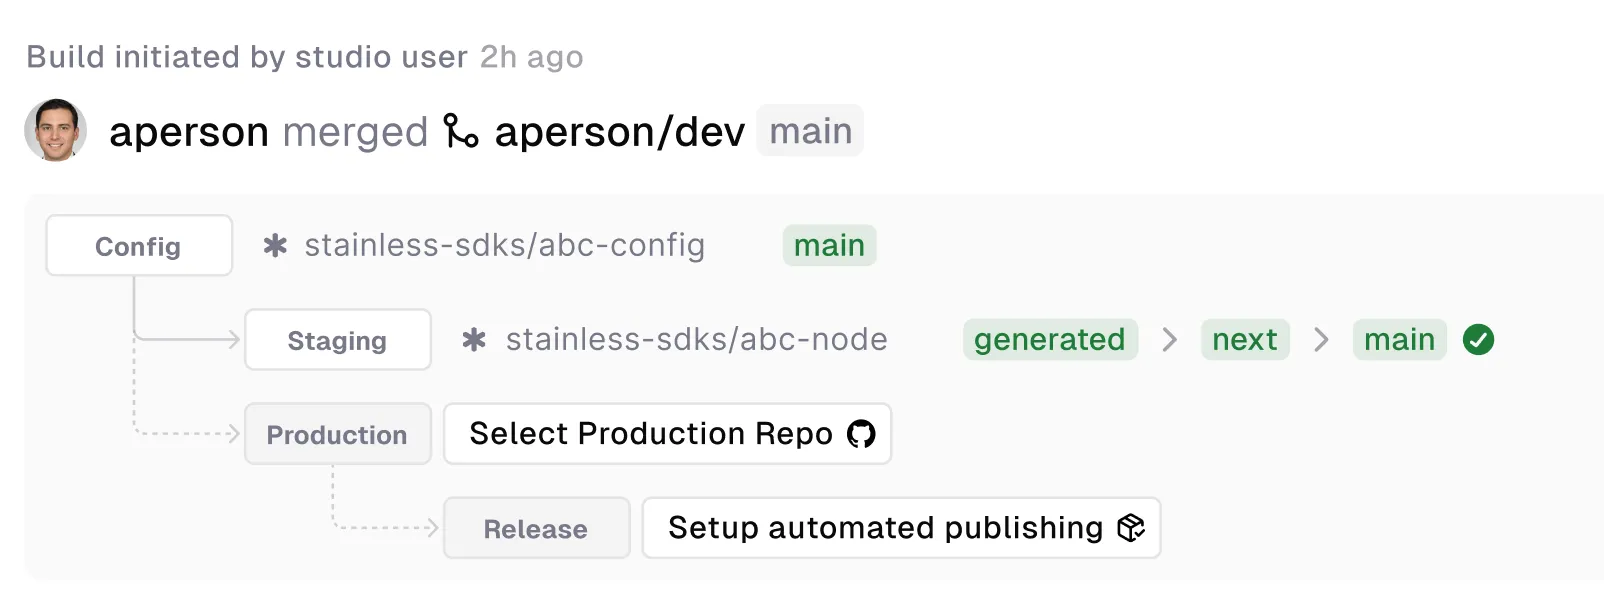
Stainless uses a few branches in your production repository to manage the release process:
main/master: The target branch of your repository. This defaults tomainbut can be configured per language usingproduction_repo.next: This branch is used to collect changes for the next release. Stainless will create Release PRs based on the changes in this branch.generated: The branch where Stainless pushes generated code from the Studio. This branch represents the latest generated code before any custom code changes are applied.release-please--*: Temporary release branches created and managed by our GitHub App. These branches are based onnextand are used to create release PRs.