Stainless Language Server
Set up the Stainless Language Server in your editor for real-time diagnostics, intelligent completions, and navigation in your Stainless config and OpenAPI spec.
The SDK Studio provides IntelliSense, diagnostics, and navigation tools for your Stainless projects. The Stainless Language Server brings these features to your local development environment.
Prerequisites
Section titled “Prerequisites”Before you begin, ensure you have:
- A code editor installed (VS Code, Cursor, Zed, Neovim, or any LSP-compatible editor)
- A Stainless account
- A Stainless project with configuration files
1 Install the Stainless CLI
Section titled “ Install the Stainless CLI”To use the Stainless Language Server, first install the Stainless CLI.
Install with Homebrew (recommended for macOS):
brew tap stainless-api/tapbrew install stlOr with Go:
go install 'github.com/stainless-api/stainless-api-cli/cmd/stl@latest'To verify the installation:
stl --version2 Set up your workspace
Section titled “ Set up your workspace”The extension operates on Stainless workspaces. Initialize your workspace by running:
stl initThis creates a .stainless/workspace.json file:
✓ Created workspace configuration at .stainless/workspace.jsonThe extension uses this file to identify your Stainless workspace and provide language support for your configuration files.
3 Install the extension for your editor
Section titled “ Install the extension for your editor”Install the extension from the Visual Studio Code Marketplace, or search for “Stainless” in the Extensions view (Ctrl+Shift+X / Cmd+Shift+X).

Cursor uses the OpenVSX registry, but you can install the extension the same way as in Visual Studio Code. Search for “Stainless” in the Extensions view (Ctrl+Shift+X / Cmd+Shift+X).
A Stainless extension for Zed is available, but not yet published in the extensions marketplace. If you would like to try it, reach out to local-dev@stainless.com or contact your Stainless sales representative.
Install the language server package globally:
npm install -g @stainless-api/stainless-language-serverAdd to your Neovim configuration (e.g., ~/.config/nvim/init.lua):
vim.lsp.config['stainless'] = { cmd = { 'stainless-language-server', '--stdio' }, filetypes = { 'yaml', 'json' }, root_markers = { '.stainless/workspace.json' },}vim.lsp.enable('stainless')vim.lsp.enable() activates the language server for the specified filetypes. The server automatically starts when you open a YAML or JSON file in a directory containing .stainless/workspace.json.
Add the YAML language server
For YAML features like schema validation and formatting, install the YAML language server:
npm install -g yaml-language-serverThen add this configuration:
vim.lsp.config['yamlls'] = { cmd = { 'yaml-language-server', '--stdio' }, filetypes = { 'yaml' }, root_markers = { '.git' },}vim.lsp.enable('yamlls')Both language servers run simultaneously on the same YAML files.
For any editor that supports the Language Server Protocol (LSP), install the language server package globally, as well as the yaml-language-server for general YAML editor features.
npm install -g @stainless-api/stainless-language-serverThen configure your editor to use the Stainless language server:
- Command:
stainless-language-server --stdio - File types:
*.yml,*.yaml,*.json - Root directory: Directory containing
.stainless/workspace.json
Refer to your editor’s LSP configuration documentation for specific setup instructions.
4 Verify the installation
Section titled “ Verify the installation”After installing the extension, open a workspace containing Stainless configuration files. The extension activates automatically when it detects a .stainless/workspace.json file.
To verify the extension is working:
- Open a
stainless.yamlorstainless.ymlfile in your workspace - For VS Code and Cursor, check the status bar in the bottom right corner for the Stainless icon

Features
Section titled “Features”Real-time SDK diagnostics
Section titled “Real-time SDK diagnostics”The language server analyzes your Stainless config and OpenAPI spec in real-time, surfacing errors, warnings, and suggestions directly in your editor. This helps you catch issues before running a build.

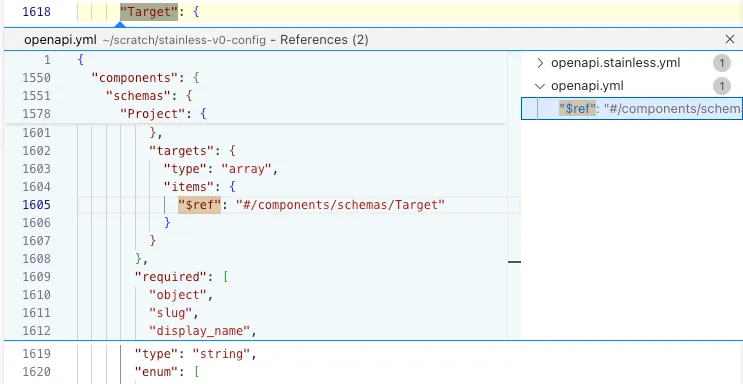
Go to definition and find all references
Section titled “Go to definition and find all references”Use Go to definition (F12 or Cmd+Click) to jump directly from your Stainless config to schema definitions, parameters, and response types in your OpenAPI spec. Use Find all references (Shift+F12) to see everywhere a schema or endpoint is used across your config and spec files.
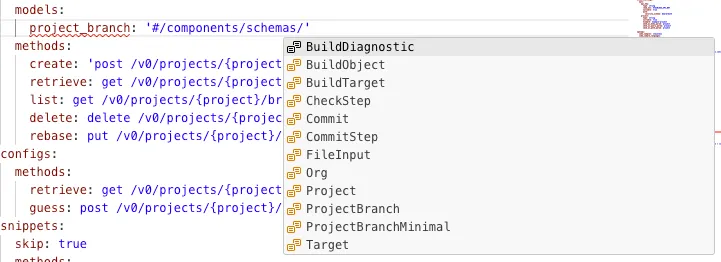
Intelligent completions in your Stainless config
Section titled “Intelligent completions in your Stainless config”The language server provides context-aware autocompletion to speed up editing. It suggests valid config options, endpoints, and schema names based on your OpenAPI spec.
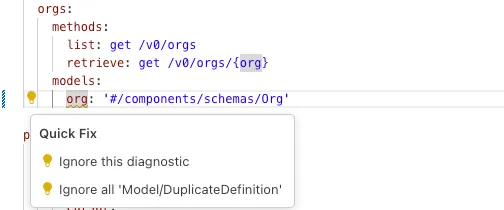
Quick fixes and code actions
Section titled “Quick fixes and code actions”Resolve diagnostics with one click using code actions. Common diagnostics have an Autofix option, and you can easily ignore any warning diagnostic.
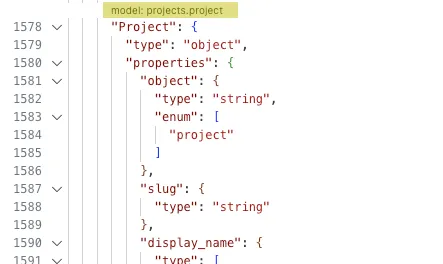
Codelenses for your OpenAPI spec
Section titled “Codelenses for your OpenAPI spec”Codelenses appear inline in your OpenAPI spec to show which schemas and endpoints are configured in your Stainless config. This makes it easy to see at a glance how your API is represented in your SDKs.
Live transformations
Section titled “Live transformations”The language server automatically generates and updates your transformed OpenAPI spec in real-time as you edit your config. Learn more about transforms.