Remote deployment
Deploy your MCP server remotely for web apps and agentic workflows
By default, MCP servers run locally on the user’s computer and accept environment variables for authorization. This works well with desktop clients like Claude Desktop or Cursor. However, it doesn’t work for end users on web apps like Claude.ai, or agentic flows like LangChain. For these cases, deploy a remote MCP server.
The default Stainless-generated remote MCP server works well for:
- Public servers
- Servers intended for agentic workflows or developers
- APIs that already support OAuth
For servers intended for general use that require authentication but don’t support OAuth, consider using a Cloudflare Worker.
Run as a remote server
Section titled “Run as a remote server”Run your MCP server as a remote server by passing --transport=http:
npx -y my-org-mcp --transport=http --port=3000For Docker, expose the port with -p:
docker run --rm -i -p 3000:3000 myorg/my-api-mcp --transport=http --port=3000Use the --port flag to specify which port the server listens on.
Stainless-hosted servers
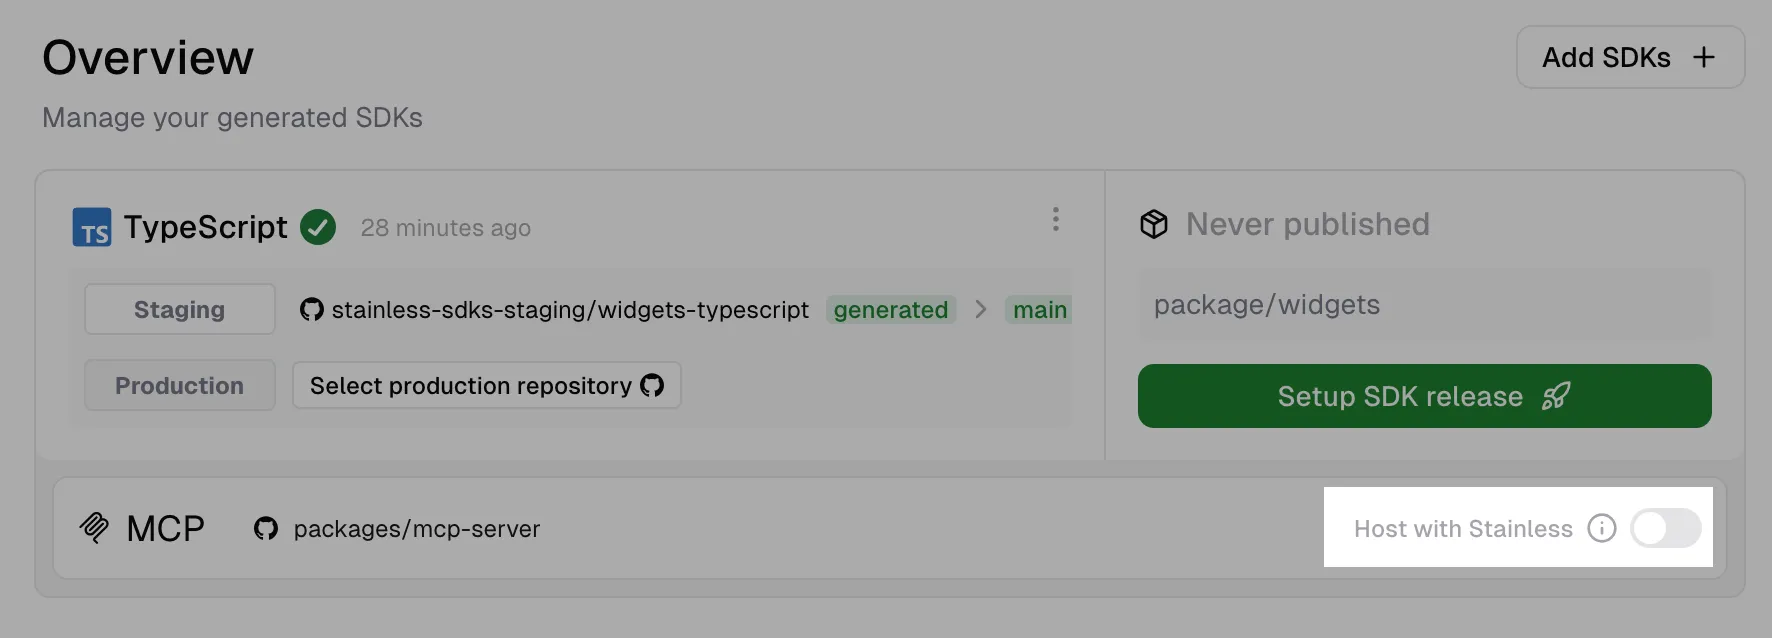
Section titled “Stainless-hosted servers”You can host your remote MCP server directly through Stainless at my-project-name.stlmcp.com.
To enable this, click the “Host with Stainless” switch in the SDK Studio MCP pane. Provisioning takes around 5 minutes. You can stop hosting at any time by toggling the same switch.
Test locally
Section titled “Test locally”Test your remote server by running a local instance:
npx -y my-org-mcp --transport=http --port=3000Connect your MCP client to http://localhost:3000.
MCP Inspector is a helpful browser-based client for testing:
npx -y @modelcontextprotocol/inspector@latestSelect Streamable HTTP as the transport type and http://localhost:3000 as the URL.
Self-hosting
Section titled “Self-hosting”The Docker image or npm package can be used to host the server in your own infrastructure.
If your use case isn’t supported, contact support for help.
Authentication
Section titled “Authentication”Public APIs
Section titled “Public APIs”If your API doesn’t require authentication, clients can connect without credentials.
If your API requires authentication but you want to expose some functionality publicly, set the API key as an environment variable when starting your server:
export MY_API_KEY=your-api-keynpx -y my-org-mcp --transport=httpHeader-based auth
Section titled “Header-based auth”Your MCP server uses the same authentication approach as your TypeScript SDK, such as the Authorization header with Bearer or Basic auth schemes. The exact headers are documented in your MCP server’s README.md.
This auth flow works with most desktop clients and agentic use cases, but some web-based clients may not support setting custom headers.
If your API supports OAuth, configure your server to use it:
targets: typescript: options: mcp_server: oauth_resource_metadata: authorization_servers: [https://auth.example.com]MCP clients automatically redirect to the specified authorization server when credentials are required.
If your API supports dynamic client registration, you can deploy your remote MCP server anywhere. If not, consider using a Cloudflare Worker with its own OAuth server.
For APIs that require statically registered OAuth apps (like Google), see OAuth authorization to configure the MCP server to handle the full authorization code flow.
Connect clients to a deployed server
Section titled “Connect clients to a deployed server”Once deployed at a URL, many clients can connect by specifying that URL.
For clients that use mcpServers.json (like Claude Desktop and Cursor):
{ "mcpServers": { "my-org-mcp": { "url": "https://mcp.example.com/", "headers": { "Authorization": "my-token-here" } } }}The headers entry is only necessary for header-based auth.
Some desktop clients only officially support local (stdio) servers. For these clients, mcp-remote lets you connect to a remote server as if it were local.
Cloudflare Worker
Section titled “Cloudflare Worker”For APIs that don’t support OAuth or dynamic client registration, Stainless can generate a Cloudflare Worker that acts as its own OAuth server. It accepts tokens from the client through a web UI, stores them locally, and gives the MCP client a server-specific token. This is also useful if you already deploy servers on Cloudflare.
Add generate_cloudflare_worker: true to your MCP options:
targets: typescript: options: mcp_server: generate_cloudflare_worker: trueThis generates a packages/mcp-server/cloudflare-worker directory containing a deployable Cloudflare Worker. It implements OAuth and collects the API keys needed to initialize the SDK client during the redirect flow.
Consult the generated README.md in the cloudflare-worker directory for instructions on running and testing locally.
Once you’ve published your SDK and MCP packages, deploy to Cloudflare using the “Deploy to Cloudflare” button in the README.md. The button provides one-click deployment directly from your GitHub repository.
Configure the OAuth consent screen
Section titled “Configure the OAuth consent screen”A default ServerConfig is generated in src/index.ts with the properties needed to initialize the client SDK. These properties are collected from users during the OAuth consent screen. You can customize this using custom code.
const serverConfig: ServerConfig = { orgName: 'MyPackageMcp', instructionsUrl: undefined, // URL showing users how to get an API key logoUrl: undefined, // Custom logo for the OAuth flow clientProperties: [ { key: 'authToken', label: 'Auth Token', description: 'The token to use for authentication', required: true, default: undefined, placeholder: '123e4567-e89b-12d3-a456-426614174000', type: 'string', }, { key: 'orgId', label: 'Org ID', description: 'The organization ID context', required: true, default: undefined, placeholder: 'my_org', type: 'string', }, ],};The clientProperties array supports various input types:
string- Text input field (default)number- Numeric input fieldpassword- Password input field (masked)select- Dropdown menu with predefined options
The OAuth consent screen automatically includes client capability detection, a read-only mode toggle, and help tooltips for each field.
Static assets and styling
Section titled “Static assets and styling”The Cloudflare Worker template serves static assets from the ./static/ directory:
static/home.md- Landing page content (rendered as Markdown)- Custom CSS and JavaScript files
- Images and other assets
Customize the appearance by modifying the Tailwind CSS configuration, adding custom static assets, or updating the home page content.